Users
Key Points to Users
- Designated area where you can go to view users.
- Enables you to view and edit all information relating to a user
- Allows you to Create, Import, and Export user data.
- Allows you to Search for a specific user or group of users.
Key Points to User Details Page
- Access the User Details page for a specific user by selecting a user tile, or selecting User Details from the ellipsis menu.
- From the User Details, you can:
- Active/Deactivate User: By selecting the checkbox next to Active a user may be set active; if no check mark is in the box the user is deactivated. Once the checkbox in un-selected the inactive user will no longer have access to HSC Cloud.
- Set a user as Email Only. Users who are email only will not need to verify their email address or be provided login credentials and will only receive reports and notifications.
- Users may update their personal information. Name, Email, Title, Address, Phone
- Select Save to save changes
- View User Accounts
- Select the account associated with the user from the drop down list. Then type the name or part of the name of the account to search. Select whether to see all accounts or only Active Accounts with the checkbox. User may then select the accounts to add or remove by selecting the Add or Remove buttons, the list on the left shows the accounts that associated with this user.
- Select Save to save changes
Preferences
Choose this tab to edit Language or Time Zone from a drop-down menu
Users may also add a photo to their profile by either dragging an image or using the choose file button to browse and select a photo from their device.
Select Save to Save any changes
Security
The basic information may be changed for each role:
Roles: Edit the Assigned Role with the Add/Remove arrows
Available Role Exceptions: Choose from this list to add specific features to this users role.
Role Exceptions: This list shows the additional rights beyond what is part of the Role for this user
Select Save to Save any changes
Advanced
API and User Keys are displayed, user may also request a New Key
History
A log of the users actions/changes to their HSC Cloud account- NOT editable
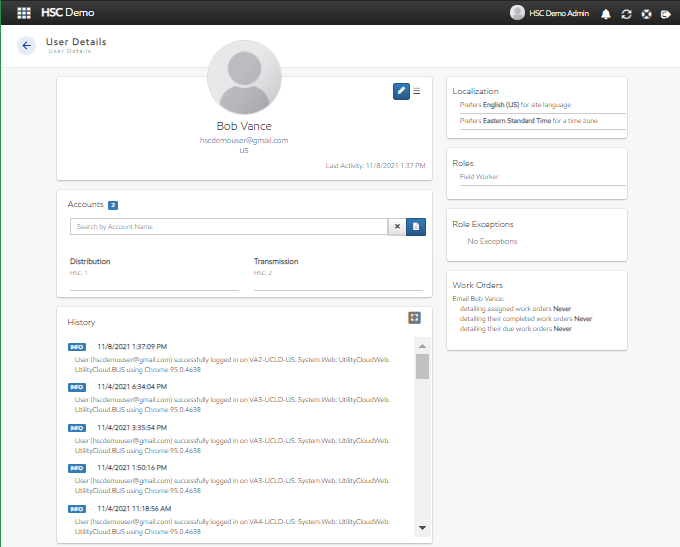
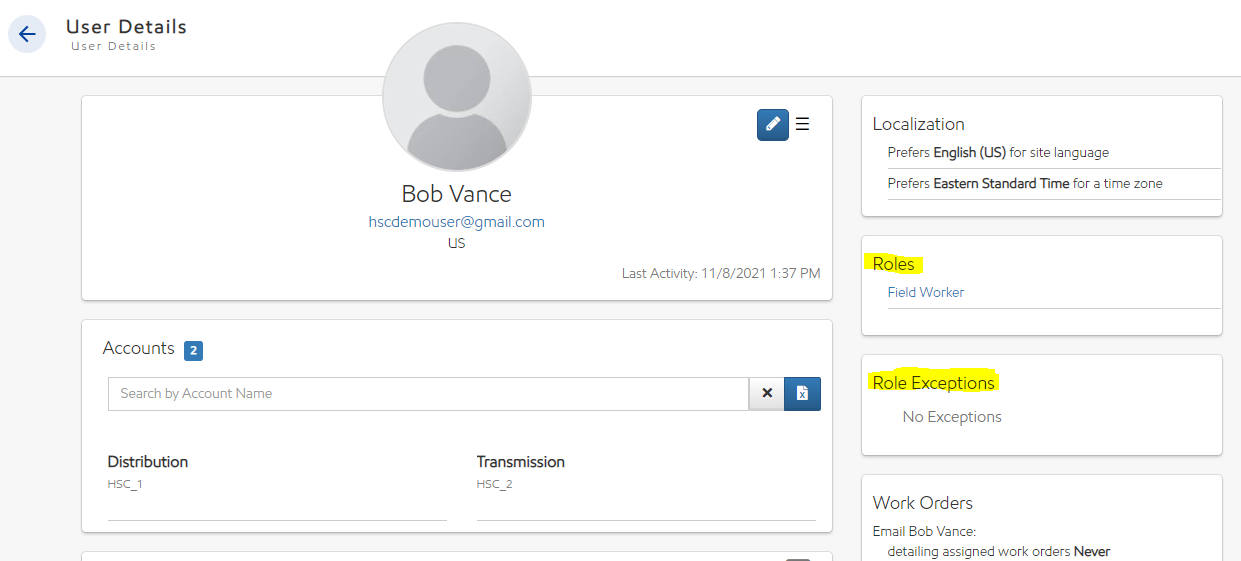
Detailed Description of User Details
The User Details page is a centralized location to see the profile selections of a specific user on HSC Cloud.
The User tile empowers efficient viewing and maintenance of profiles.
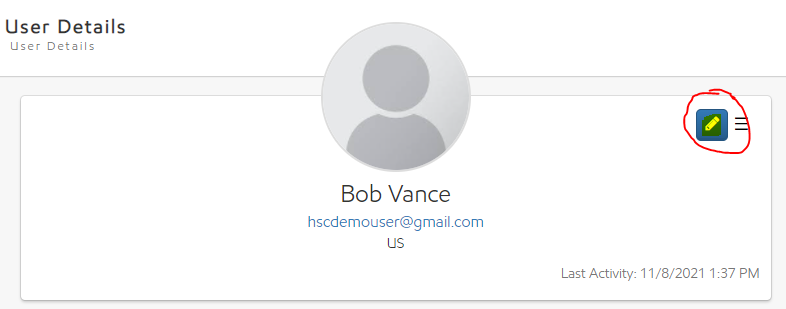
Hovering over the upper right corner in any panel reveals the edit icon (pencil).
- Accounts: View and manage associated accounts by selecting the pencil button that appears in the upper right corner of the Account Area
- History: View a log of changes to the profile in the History Area
- Localization: View and manage language and time preferences by selecting the pencil button that appears in the upper right corner of the Localization Area
- Roles: View and manage roles by selecting the pencil button that appears in the upper right corner of the Roles Area
- Role Exceptions: View and manage Role Exceptions by selecting the pencil button that appears in the upper right corner of the Role Exceptions Area
- Work Orders: View and manage Work Order notifications by selecting the pencil button that appears in the upper right corner of the Work Orders Area
Search for a User
Quick Steps to Search for Users
- Select the User tile from the Dashboard or from the quick navigation menu.
- Select the Drop down to choose an Account.
- Select the Quick Search text box and type in the search criteria.
- Select Search (magnifying glass), and the search results appear below.
- Refine results by selecting the number of results to display on the page, and the desired view, cards or list.
Security Rights Required: View Users
Advanced Search
Advanced search allows you to create simple or multi-attribute search criteria.

Advanced search allows you to combine keywords with operators such as AND and OR to produce more relevant results. Depending on the field criteria selected, additional options become available: equal, not equal to, begins with, doesn't begin with, contains, doesn't contain, ends with, doesn't end with, is empty, is not empty.
Enter in search criteria in the Advanced Search area. Select the field to match from the drop down, and then specify the rule.
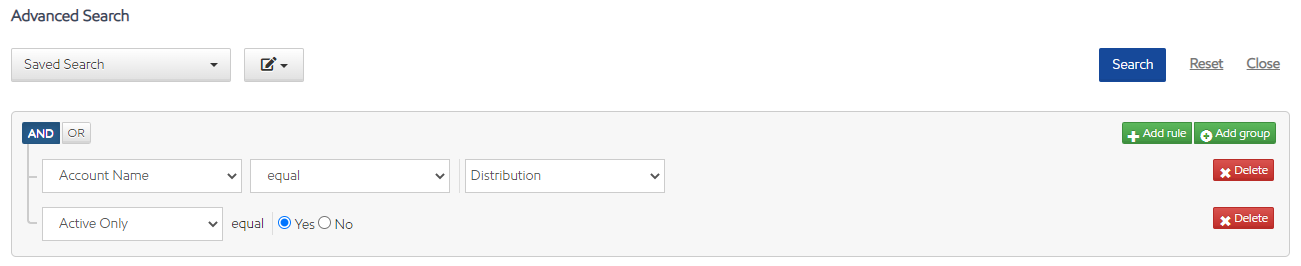
Select Search to perform the search.
To save a search, select Save and choose Save As to name the search.
To use a saved search, select the Saved Search drop-down and select the desired search to run.
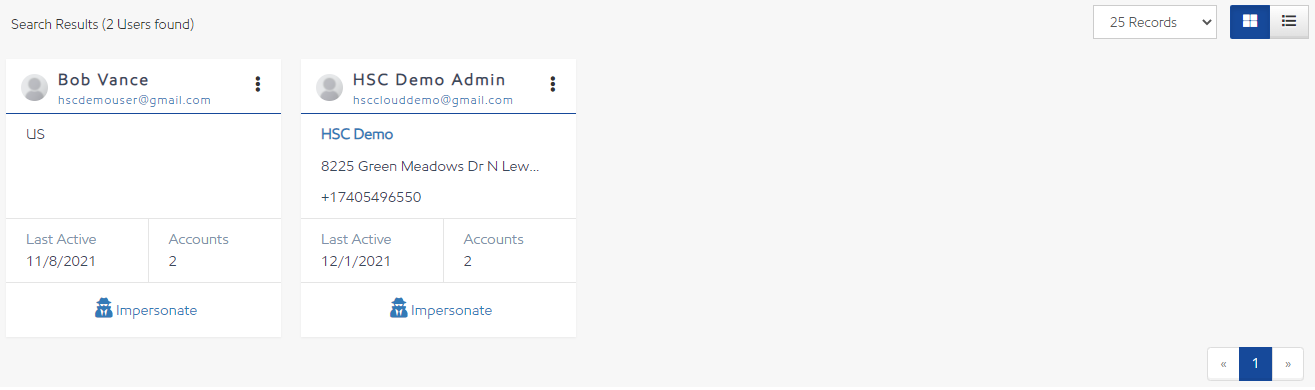
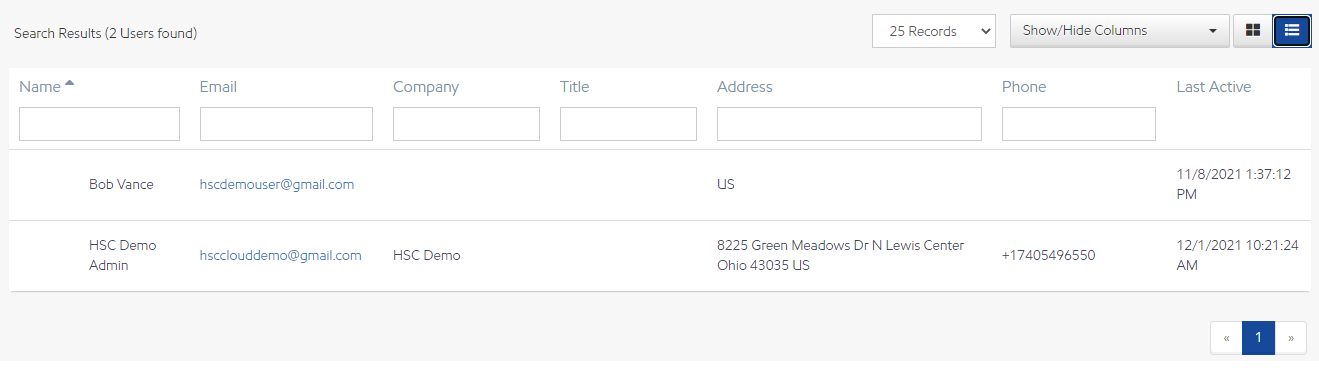
View Settings
Users have the option to toggle between a Card View and a List View when viewing users.
Card View
List View
You can sort and filter by selecting the column header title and entering a filter value in the text box. You can also show/hide columns by adding/removing the check mark next to the column name in the Show/Hide Columns list.
Add a User
Quick Steps to Add a New User
- Go to the Users tile from the Dashboard or from the quick navigation menu.
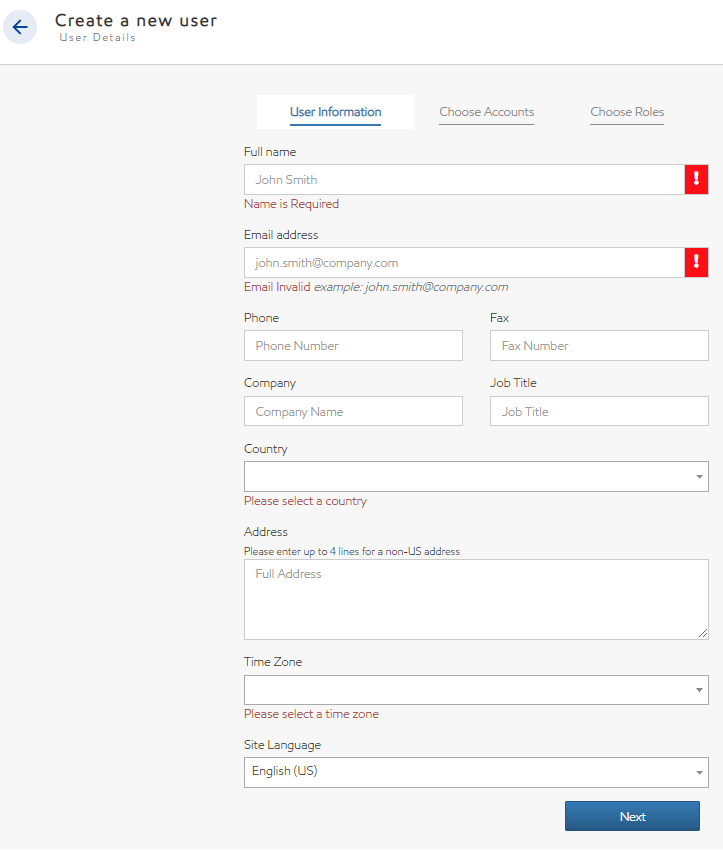
- Select Create.
- The Create a new user wizard opens.
- Required Fields are Full Name, Email Address, Country, and Time Zone; complete these fields and select Next.
- Choose the Accounts to associate with this user; select Next.
- Choose Roles; double clicking a role will add it to the assigned roles.
- Select Next.
An Email is sent to the person who created the user and another email is sent to the new user to confirm their email address and create a password.
Add A User
Assign a Security Role to a User
Quick Steps to Assign a Security Role
- Select the User tile from the Dashboard or from the quick navigation menu.
- Select the account the user is associated with from the drop down.
- Locate the user by searching for the name or scrolling through the list.
- Navigate to the Roles or Roles Exceptions area.
- Hover over the upper right corner to make the pencil appear.
- Select the pencil to edit.
- Find the role or right to assign or remove by entering search criteria in the Filter text box.
- Select the role(s) or right(s).
- Add or remove using the Add All, Add Selected, Remove All, and Remove Selected.
- Select Save to save changes. Select Cancel to exit without saving changes.
Security Rights Required: Edit Security Roles
Details to Assign a Security Role to a User
Roles: Select from the list of available roles.
Available Role Exceptions: Choose from this list to add specific features to this users role.
Role Exceptions: This list shows the additional rights beyond what is part of the Role for this user.
New User Email Verification
When a user is added to the system an email is generated and sent to the user containing a link that walks the user through logging into HSC Cloud for the first time.
The administrator who created the user also receives an email notification that the user was created.
The link in the new user email directs the user to a page where they are asked to accept the site Terms & Conditions.
Finally, the user is brought to a page where they can select and verify their new password.
If required information is missing on the user (such as their address) the user is directed to fill out the required information on their profile. The user may also update their preferences.
Once this process is completed, the user's HSC Cloud experience awaits. In the future, the user is asked for their username and password to login to HSC Cloud.
Detailed Description of New User Email Verification
Unverified after 15 days
If the new user does not verify their email after 15 days, an email is sent to the administrator who created the user to alert them. The administrator should contact the user to encourage them to perform the initial email verification login before the 30 day lockout (see below).
Unverified after 30 days
If the new user does not verify their email after 30 days, the user is deactivated and locked out. The user will need to contact the administrator who created their user account before they are able to log in.
The administrator needs to re-activate the user, unlock them, and resend the verification email. Since the user has never logged in or verified their email they are walked through the process accepting the terms and conditions and selecting/verifying their password.
Resend a Welcome Email
Quick Steps to Resend a Welcome Email
- Select the User tile from the Dashboard or from the quick navigation menu.
- Search for and select the User that the log in email needs to be sent to.
- Open the User Details.
- Select the Triple Bar (menu), and select Send Welcome Email.
This resends the welcome email to the user, containing a link to log in to the site. Select Yes when prompted to send this email to the user.
Security Rights Required: Edit Users

Detailed Steps to Resend a Login Email
If an active new user has not yet logged into HSC Cloud, the administrator can resend the login email.
- Select the User tile from the Dashboard. This tile contains a list of all the active and inactive users.
- Search for and select the user that the log in email needs to be sent to.
- Once the user information has loaded, Select the Triple Bar (menu) to access more options associated to this user.
Once the resend welcome email is selected and confirmed, the user receives a new login email.
Logging In for the First Time
Once the log in email is received, the user can proceed with logging in for the first time. If additional information is needed, please view our help file on Logging In for the First Time.
Resend Welcome-Verification Email
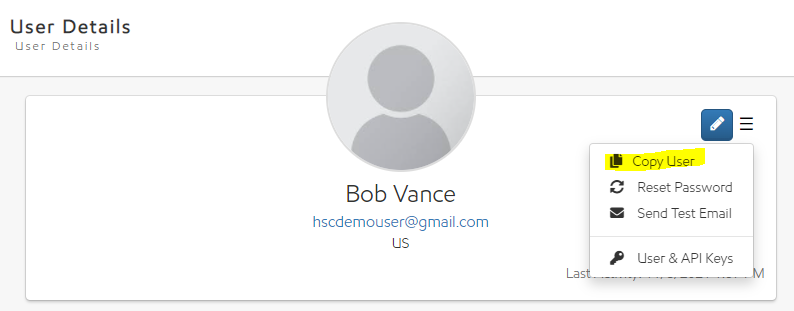
Copy a User
Quick Steps to Copy a User
- Select the User tile from the Dashboard or from the quick navigation menu.
- Search for or select the User to copy.
- Select the vertical ellipses and select Copy User. The Create a new user wizard appears.
- Enter in required new user information: Full name, Email address.
- Once new information is entered, select Submit.
Security Rights Required: View Users; Copy Users
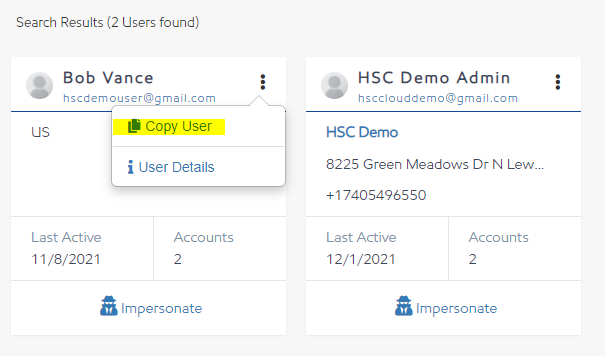
or open the User Details, select the triple bar and select Copy User.
Edit a User
Quick Steps to Edit a User
- Select the Pencil Icon to edit information in the desired section. (hover over the upper right hand corner to display the icon).
- Enter or update the user information.
- Select Save to save changes to this user.
Security Rights Required: View Users; Edit Users
Reset a User Password
Quick Steps to Reset a User Password
- Select the Users tile from the Dashboard or from the quick navigation menu.
- Search for or select the User requiring a password reset.
- Once the user is found, access the User Details page for the user by selecting the card, or selecting User Details from the ellipsis menu.
- Select the Triple Bar (menu) and select Reset Password.
The user will receive an email with a link that walks them through resetting their password.
NOTE: Any user can reset their own password but only users with the appropriate security right can reset another user's password.
Security Rights Required: View Users; Reset User Password
Once a user tries to login five (5) consecutive times with an incorrect password, the user is locked out of HSC Cloud.
If a user is locked out due to too many incorrect password attempts an email is automatically sent to the user containing a link to unlock and login.
The locked out user can unlock himself by selecting the link in the automatic email. The locked out user is brought to the login page to enter their username and password. If the user has forgotten their password they can select Forgot Password.

The following message is displayed to advise the user of the email:

Notes – The Unlock process does not change the user’s password.
Users are encouraged to reset their password if they did not expect this email.
Use the login page Forgot Password a password is not remembered.
During login, the Password: field clears if an incorrect password is detected to avoid repeat clicks by the user.
Quick Steps to Unlock a User
When a User is locked, out a tag appears on their profile.
To unlock a locked user:
- Select the Users tile from the Dashboard or from the quick navigation menu.
- Select the Account associated with the User from the drop down.
- Enter the name of the User in the search field and select Search.
- Select the User and open the User Details.
- Select the Triple Bar (menu), and select Unlock User.
- An email is sent to the user letting them know that their account is unlocked.
- Select Save to save changes.
Once a system administrator unlocks the user, they will be able to access HSC Cloud using their old username and password.

Unlock User from email
Users are notified with an email when their account is locked out due to 5 attempts to access the account with an incorrect password. A User can unlock himself by selecting the link in this automatic email. The User is brought to the login page to enter their username and password. If the user has forgotten their password they can select the Forgot Password link.
Deactivate a User
Quick Steps to Deactivate a User
- Select the User tile from the Dashboard or from the quick navigation menu.
- Search for the User.
- Once the user is found, access the User Details page for the user by selecting the card, or selecting User Details from the ellipsis menu.
- Selecting the Pencil button to edit the user.
- Uncheck the Active box.
- Once completed, select Save (The inactive tag appears on the users profile).
Deactivating a user who is no longer accessing HSC Cloud keeps the user counts appropriate for usage reports.
Security Rights Required: View Users; Edit Users
Update Work Order Email Preferences
Steps to Update Work Order Email Preferences
- Select the User tile from the Dashboard or from the quick navigation menu.
- Search for the User.
- Once the user is found, access the User Details page for the user by selecting the card, or selecting User Details from the ellipsis menu.
- Selecting the Pencil button to edit the user.
- Check or un-check the desired options.
- Select Save.
Security Rights Required: Access Work Order User Preferences
Importing Users
Quick Steps to Importing New Users
- Select the Users tile from the Dashboard or from the quick navigation menu.
- Select the menu button on the User Search screen, and then select Import.
- Select Download a Blank Template. This downloads an .XLSX spreadsheet with the correct entry columns for the user information.
- Enter the information for the users into the corresponding columns. All information must be entered in the correct formats - see Import Fields defined below.
- Save the file in .XLXS format.
- Import the file into HSC Cloud following the Import Process defined below.

Quick Steps to Edit Existing Users by Import
- Select the Users tile from the Dashboard or from the quick navigation menu.
- Select the menu button on the User Search screen, and then select Export. The current search results are exported.
- This downloads a .CSV spreadsheet of existing users based on the search options.
- Update any information for the users in the corresponding columns. All information must be entered in the correct formats - see Import Fields defined below.
- Save the file in a .CSV format.
- Import the file into HSC Cloud following the Import Process defined below.
Import Process
- Select the Users tile from the Dashboard or from the quick navigation menu.
- Select the menu button on the User Search screen, and then select Import.
- Upload the file by dragging the file into the box or find the file by selecting Browse.
- If the information was correctly formatted in the spreadsheet, the users are added to or updated in HSC Cloud with the corresponding information.
- However, if the information was incorrectly formatted, the Upload window displays the errors.
- Select on the file name (i.e. import_users.csv) to view the error report. It lists each line (row) on the sheet that contains an error along with the error that is on that line. Once the errors are fixed, retry the import.
Security Rights Required: View Users; Import Users
Details on Importing Users
Import Fields
- Full Name (Required): Full Name of the user.
- New Email (Required for new user): Email address for new user login or new email/login of an existing user.
- Original Email (Required for existing user): Email of an existing user (for updates).
- Company: Name of Company.
- Is Active: Enter 'Y' for yes, or 'N' for no.
- Preferred Language: Valid values include English, Spanish, Chinese, French, or German.
- Country Code (1,2): Must abbreviate the country using the proper two letter .NET country code. Please see Country Code Listing for a full list of countries preceded by their two letter abbreviations. If the account is located in the US, the user must correctly enter the Address using the proper format outlined below, as the information will be validated.
- Address (1,2) must be entered on separate lines:
- For example: For a United States address the user would enter the information as follows: Address 1 = 123 Main St Suite 101, Address 2 = City (i.e. Boston), Address 3 = State Abbreviation (i.e. MA), Address 4 = Zip Code (i.e. 02110).
- Phone (1,2,3) Type: Valid values include "phone", "fax"
- Phone (1,2,3) Number (at least one type is Required): Enter the entire phone number including the area code.
- Phone (1,2,3) Extension: If there is an extension associated with the Phone number, enter it here.
- Phone (1,2,3) is Primary: Indicate if the phone number is Primary by entering 'Y' or 'N' if including more than one phone number of the same Phone Type.
- Accounts (at least one is Required): Name of each account the user is associated with. Enter multiple Accounts with a "+" plus sign between each Account. For example: Account1+Account2
- Roles (at least one is Required): : Name of each role the user is assigned to.
- Role Exceptions: Any role exceptions added to the user (+ indicates has rights / - indicates removal of right, if multiple role exceptions separate with | ).
- Time Zone: Enter the users time zone. For example Eastern Standard Time.
- Receive Reports Via: Valid values include "Email", "Fax" or "EmailandFax" (blank defaults to None).
- Receive Messages Via: Valid values include "Email" (blank defaults to None).
Import Errors
The following is a list of all of the possible error reports and how to fix the mistakes:
- Missing email. > Enter an email address (must be unique for new user)
- Phone is required. > Enter a phone number
- At least one valid Account is required. > Enter at least one valid account
- At least one valid Role is required. > Enter at least one valid role
- The security role 'security role here' does not exist. > Security role entered does not match available options
- The user 'user here' already exists. > New user and the specified email address already exists in the system
- The account 'account here' does not exist. > Account entered does not match available options
- The security role exception 'security role exception here' does not exist. > Security role exception entered does not match available options
- Country 'country here' is invalid. > Enter valid country code
- Phone Type is invalid for 'phone number here'> Enter a valid phone type
- Street is missing for Primary address. > Enter street address in Address 1
- City is missing for Primary address. > Enter city in Address 2
- State is missing for Primary address. > Enter state in Address 3
- Zip is missing for Primary address. > Enter zip code in Address 4
- State is invalid for Primary address. > Enter a valid state code in Address 3
- Zip is invalid for Primary address. Zip codes should be in the form '00000' or '00000-0000'. > Enter valid zip code
- Preferred Language is not valid. > Language code entered does not match available options
- User 'user here' does not exist. > Update existing user and the specified original email does not exist in the system
- Only one primary fax number is allowed. > Only one fax number should be indicated as primary
- Only one primary phone number is allowed. > Only one phone number should be indicated as primary
- Invalid email address. > Enter valid email address
Exporting Users
Quick Steps to Export Users
- Select the User tile from the Dashboard or from the quick navigation menu.
- Select the menu button on the User Search screen, then select Export.
- Select Submit.
Security Rights Required: View Users; Export Users Search Results, Export Users Blank Spreadsheet